You can count and total cash donations (coins and bills) with the Cash Counting window in the program. You can access that window from any of three different places:
•The Maintenance ⇒ Count Cash menu option, or
•The Count Cash button at the bottom of the Batch Entry window (after entering all of the cash donations on that window, so that the total can be confirmed), or
•The Count Cash button at the bottom of the Bank Deposit entry window (after selecting to Include all of the cash donations on that window, and clicking Save on the deposit, so that the total can be confirmed).
Initial Setup
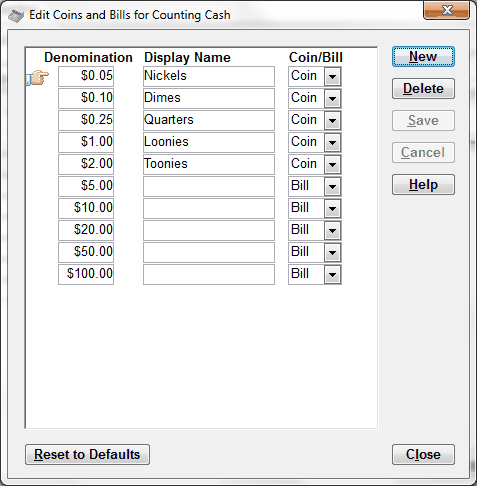
The first time you try to use the Count Cash window, the following setup window comes up, for you to confirm exactly which denominations of coins and bills you want to count in your country. The example window below is for Canada, but it will come up differently for different countries. (Currently the program knows the standard coins and bills for Canada, the U.S.A., Australia and New Zealand - all others are initially set up to start with the choices from the U.S.A., which you can then edit.) The default coins listed for the U.S.A. include the 50 cent and $1 coins - if you never really see those coins, you can delete them from the list.

As you can see, you get to specify the Denomination (amount) of each coin or bill, you can optionally give them a Display Name for use in the actual Count Cash window, and you have to specify whether each is a Coin or Bill. (That allows totals to be generated for coins and bills, and also allows for places like the U.S.A. where there is both a $1 coin and a $1 bill!)
If there aren't standard names for any of the coins or bills in your country, or you would rather just use the denominations when doing actual entry of a cash count, just leave the Display Name fields empty.
If there is an entry there that you don't want, click into any field in its row and click the Delete button. To add another coin or bill, click New then fill in the details in the empty row that comes up. Don't worry about the sort order - that will be fixed when you click Save to save your change. You can also just edit the contents of any fields in any rows, then click Save. As always, when there are changes you can Cancel if you want to abandon your change.
If you have made some changes and don't like them, the Reset to Defaults resets them to their original settings for your country. Click Close when you are done in this window.
Counting Cash
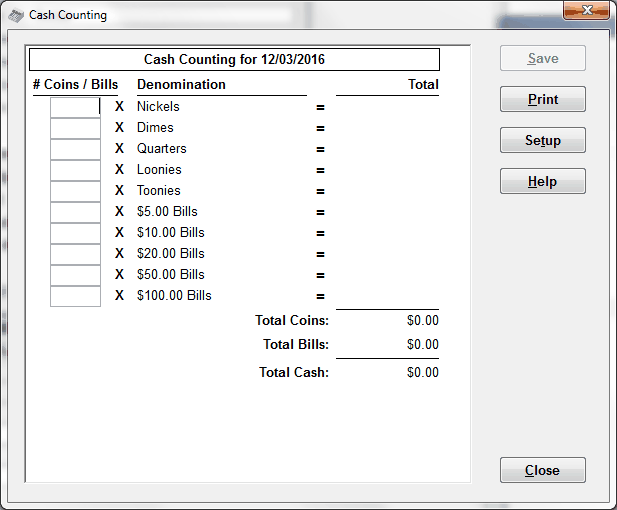
Once that setup has been done, when you use any of the three methods for bringing up the cash counting window listed at the top of this page, the following window comes up:

As you will see, in the Denomination column, any Display Names from the setup window are shown, or where there is no Display Name, it just shows the denomination and whether it's a coin or bill.
All you have to do is enter the counts of each type of coin or bill that you received in the # Coins / Bills column. As you enter each one and Tab or click out of that field into another one, the totals are shown at the bottom - Total Coins, Total Bills, and the overall Total Cash. Just leave the count empty for any denominations of coins or bills that you didn't receive.
If you came into this window from either Batch Entry or a Bank Deposit, the totals of Cash donations in those windows will be passed into this window, and instead of the heading at the top showing just for instance "Cash Counting for 12/03/2016" as shown in the above example, it will show something like "Cash Counting for 12/03/2016: Expected Total $123.45".
When you click Save to save your count, it will first compare the Total Cash from what you have entered to the Expected Total if one was displayed, and warn you if they do not match. If they don't, you will have to decide whether to save it anyways - you can make more changes after that and save again. You will also have to decide where the problem is and thus what needs to be corrected - it could be the counts you entered here, or it could be the values from the previous window (Batch Entry or Bank Deposit) that added up to the Expected Total.
The Print button prints a report that is basically identical to the contents of the window. You don't have to Save before you Print. Please note, however, that if you are creating a Bank Deposit, there is a new Deposit Slip report from that window that includes both a list of the cheques and any cash count you have done from that window, so if you are going to print that report, there is no need to print from this window.
The Setup button takes you to the initial setup window for specifying which denominations of coins and bills you want to count for your country, as shown at the top of this Help page. If you have already entered some counts of coins or bills on this window when you click Setup, those counts will be lost (after you are asked whether that is OK).
Click Close when you are finished in this window and have saved the count.
Prompting to use Previous Counts
When you click Count Cash from a Batch Entry window, if a previous count was saved for the same date from the Batch Entry window, you will be prompted with an option to load that as your initial count. That lets you continue work on a count as you correct or add to the batch entry. Of course, if you are entering two independent batches for the same date, answer No when prompted whether to load the previous count, when you are doing the second batch.
When you click Count Cash from a Bank Deposit window, if a previous count was saved for the same bank deposit, it will first be loaded. If not, and if a count was saved from a Batch Entry window or the Maintenance ⇒ Count Cash menu option less than a week prior to the Bank Deposit date, you will be prompted with an option to load that as your initial count.
This topic was last edited on Feb 17, 2023