You can use the menu option Maintenance ⇒ Create Bank Deposit ⇒ Individual Transactions for transactions that automatically go into your bank account (or another account you are tracking in your accounting program), like eTransfers for Canada, ACH for the U.S.A., or online services like PayPal, which might also apply fees to each transaction. While you don't actually manually deposit anything into your bank for such transactions, what you need to do about them in DONATION is similar enough to the other Bank Deposit features that it's also under the Maintenance ⇒ Create Bank Deposit sub-menu.
You would instead use the Maintenance ⇒ Create Bank Deposit ⇒ Cash and Cheques (or Cash and Checks for users in the U.S.A.) menu option to select groups of donations that you are actually going to go to a bank to deposit, and process them appropriately.
Note: In releases of DONATION prior to 6.21, this Cash and Cheques bank deposits feature was just done with the menu option Maintenance ⇒ Create Bank Deposit, with no sub-menu option required, unless you had also configured Abundant online donations. In that case, this feature was a sub-menu option, and another option on the Maintenance ⇒ Create Bank Deposit sub-menu was Abundant Donations, for Abundant bank deposits
Using the Individual Transactions option, you can select groups of donations for one payment method like eTransfer, print a detail report for those donations, and optionally export a file containing each donation as an individual transaction for importing into to one of two accounting programs: either Software4Nonprofits ACCOUNTS or Intuit QuickBooks Desktop.
You do not have to use the features in DONATION about bank deposits. They are unavoidably a bit complicated, and organizations have used DONATION with no problems for many years without these features being available. For many users, they can see what will be in their bank deposit with other reports, like the Reports ⇒ One Date Donation report (especially for churches) or various of the Reports ⇒ Donation ⇒ All Donations reports, with a suitable date range selected.
Before you can create bank deposits in DONATION, you need to do some configuration. You do that with the Maintenance ⇒ Configure Bank Deposits menu option. That includes configuring which accounting program you use, the names of the accounts in your accounting program that correspond to your donation categories, and which donation Paid By values should be included in bank deposits. (That part about Paid By values, however, only applies to Cash and Cheques bank deposits - you should not specify that Paid By values you will use with this Individual Transactions feature are supposed to be in bank deposits!)
Once you have bank deposits configured to your satisfaction, you can use the Maintenance ⇒ Create Bank Deposit ⇒ Individual Transactions menu option to bring up the following window:
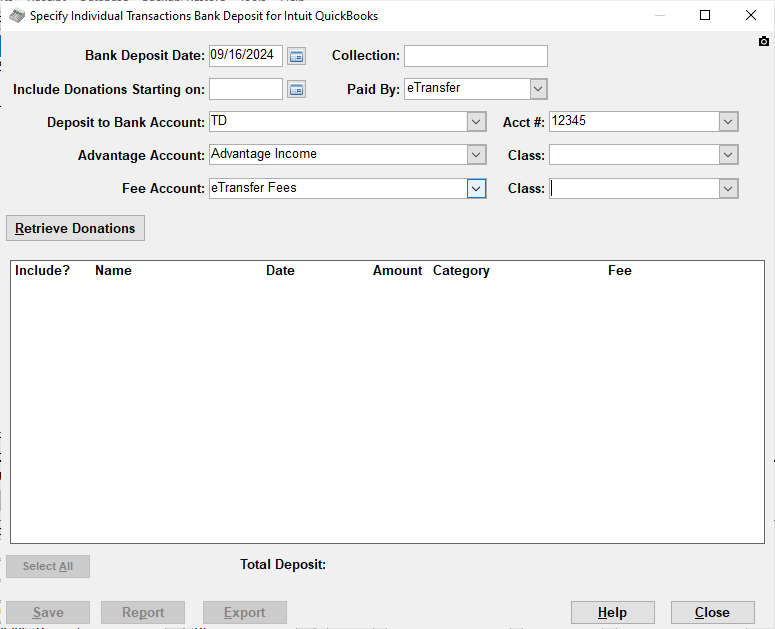
Depending on some settings on DONATION, the Advantage Account, Advantage Class and Fee Class fields may be absent. This is explained further later in this Help topic.
If you have configured in the Donations tab of Maintenance ⇒ Main Window Options to not show the Eligible Amount field, the Advantage Account field will not be displayed. The Eligible Amount is relevant if you are using Split Receipting, for example for fundraising events, where there is a Total Amount donated, and an Eligible Amount (the amount the donor can claim on their taxes). The difference between those two amounts is called the "Advantage" by the Canada Revenue Agency. When creating bank deposits and exporting them to accounting programs, DONATION always assumes that the amount of the advantage, regardless of the donation category of that donation, will go to the same accounting program account. You specify that account in that "Advantage Account" field, which must be the name of an income account in your accounting program.
Further to this, if you specified in your bank deposit configuration that you were using QuickBooks, and using Classes in addition to Accounts, the Class field displays beside the Advantage Account field, for the Advantage Class - the QuickBooks class to be used for any Advantage amounts exported to the Advantage Account. Similarly a Class field displays beside the Fee Account field, for the Fee Class for QuickBooks. (Note: you are never prompted for a class for the Bank Account, because generally classes are only used in QuickBooks for income and expense accounts, not asset accounts like banks.) If you are not displaying the Eligible Amount field, not using QuickBooks, or not using Classes, the Class field is not displayed.
How to use this Window for New Bank Deposits
Fill in the desired Bank Deposit Date, which defaults to today's date, and the date for Include Donations Starting on. That allows you to specify how far back to look for donations that might be included in this bank deposit. Both of these date fields have a button to their right for popping up a calendar, if you prefer to select the dates in that way.
The Collection field allows you to enter anything you want, to distinguish multiple Individual Transactions bank deposits to the same bank account and for the same Paid By value on the same date, which are otherwise not allowed. There is no need to fill it in if you are only making one Individual Transactiosn bank deposit for a given Paid By value on a given date.
The Include Donations Starting on date must be in the program's current working year, which is usually a calendar year. If you are in a country like the United Kingdom, Australia or New Zealand and you are Using Fiscal Data Entry and Receipting, and you are working on a year that is a fiscal year, the date you enter will have to be within that fiscal year. Only donations within the current working year will be considered for inclusion in the bank deposit.
The Paid By field must be entered, as a value you enter in the Cheque # / Paid By field for donations. Only donations with that value (possibly with a different capitalization) will be considered for inclusion in this deposit. The drop-down list will include all values shown in Maintenance ⇒ Donation Paid By Values that do not have the "Include in Bank Deposit" checkbox checked - the ones where it is checked are for bank deposits for cash and cheques!
If you have moved into a new working year with Maintenance ⇒ Change Year, and need to do a bank deposit including donations from the previous year, you will need to temporarily switch back to that year with the same menu option to do a bank deposit including only the remaining donations in that year. Then you can switch back to the new year, and do a 2nd bank deposit (if necessary) containing the new donations in this year. Sorry, there is no way to have one bank deposit contain donations in multiple working years.
Fill in the Deposit to Bank Account name, the bank's Acct # for that bank account (not the one in your accounting program!), and if they are displayed, the Advantage Account and Advantage Class. (For QuickBooks, if either of those accounts is a sub-account, you have to enter the full name, separated by colons, for example "Parent Account:Sub Account".) Do not enter the account numbers in any of these fields - just the exact names as they are listed in your accounting program.
If any of the donations you will include in this Bank Deposit will have fees, you need to fill in the Fee Account, and if you are using QuickBooks, can optionally fill in the displayed fee Class to its right. As with the Advantage Account, do not enter account numbers, only names, and for QuickBooks enter sub accounts as for example "Parent Account:Sub Account". The Fee Account should be the name of an Expense account in your accounting program.
You can type the desired account names into those fields. However, after the first time you have used this window, the account name and number and optional class names will be memorized for you and displayed in a drop-down list for each field, showing the values you have used within the last 365 days. The most recently used values will also be automatically redisplayed each time you return to this window. You can select alternate values from the drop-down lists by just starting to type their names, and they will pop up, or of course you can type in something different if that is appropriate.
If you are using ACCOUNTS as your bookkeeping program, and it is installed on the same computer you are running DONATION on, what is in those drop-down lists changes. If possible, the following changes will be made:
•The Deposit to Bank Account field will be changed to a drop-down list of the usable Bank accounts from ACCOUNTS.
•If the Advantage Account field is displayed, it will be changed to a drop-down list of the usable Income accounts from ACCOUNTS.
•The Fee Account will be changed to a drop-down list of the usable Expense accounts from ACCOUNTS.
For QuickBooks Desktop, although in our testing with QuickBooks 2012 Pro the matching of account names is not case-sensitive (the names can vary in the use of upper and lower case between DONATION and QuickBooks), their documentation is silent on that point, and various websites for other products that integrate with QuickBooks say that the matching is case-sensitive. So it will be safer to use the account names in the exact same case as you have them in QuickBooks. For ACCOUNTS, the matching of account names is definitely not case sensitive.
Then, click the Retrieve Donations button. The program will then look to see whether you have a previous individual transactions bank deposit on the same date, perhaps with the same bank account name and number and Paid By value. If so, you will be prompted with an option (or in some cases required) to edit that existing bank deposit instead of creating a new one.
If it's a brand new bank deposit, a list of donations will then be retrieved that satisfy all of the following criteria:
•Their donation date is at least the specified Include Donations Starting on date, and is in the current working year.
•They have not been included in a previous bank deposit (of any type).
•They have accounting accounts associated with their donation categories (in the window for associating accounts with categories).
•They have a Cheque # / Paid By value that matches the entered Paid By value, possibly with different capitalization.
•The Amount is greater than zero.
If you are editing an existing bank deposit, on the other hand, whichever donations were previously included in that bank deposit will also be retrieved, whether or not they still match those criteria above, along with any new donations satisfying the criteria above. That will allow you to add further donations to the same deposit.
If you are doing a new bank deposit, and one or more donations do not appear in the window shown below that you think should be eligible to be included in that deposit, it must be because one or more of the bullet points above is not satisfied. If you can't figure it out, you can use Reports ⇒ Bank Deposit ⇒ All Donations with Deposit Status to see the status of every donation with a range of dates that you specify, with whether they have already been included in a bank deposit, or will be omitted from a new bank deposit, and if so why, or would be included in a new bank deposit. From there you should be able to find the donation(s) in question and determine what you need to fix to get them included.
Your list of donations will appear in the middle section of the window, looking like this:
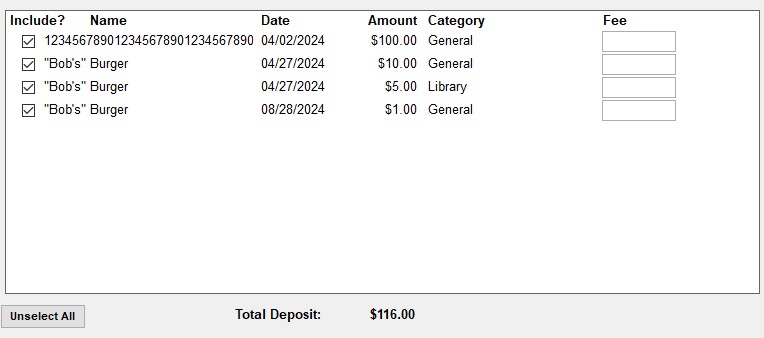
Under the Include? heading, there is a checkbox on each row, indicating whether or not that donation is to be included in the bank deposit. For a new bank deposit, all of the donations will start out with that checked, on the assumption that you will deposit all new donations. When you re-retrieve an existing bank deposit, only the donations that were previously saved with that Bank Deposit Date will be checked, and all new ones will be unchecked.
You can check or uncheck the Include checkmark for each donation by clicking on the checkmark, or in fact, anywhere on the line other than the Fee field. You can also use the Select All button (which changes to Unselect All if everything is already checked, for example after retrieving donations for a new Bank Deposit Date).
You can enter fee amounts for individual donations, if there are any, in the Fee field. If they have already been entered on the main window (if that field was enabled on the Donations tab of Maintenance ⇒ Main Window Options) those values will appear here and you won't have to enter them again.
The total of all donations for which you have "Include" checked shows to the right of the "Total Deposit" text below the list of donations.
When you are satisfied that you have the right donations checked, click Save. (If you retrieved for an existing Bank Deposit Date, and you haven't made any changes, there is no need to save, so that button is inactive.)
Then, you can click Report to display a bank deposit details report, with three sections. The first section shows the details of the donations included in the bank deposit (similar to the list in the middle of this window). The second shows the totals by donation category. The third shows the individual transactions, one for each donation, that will be exported to your accounting program, if you use the Export button, or that can be easily manually entered into any accounting program other than ACCOUNTS or QuickBooks Desktop. You will probably want to print and save that report.
There's one exception to that third section of the report (and the transactions in the Export button's export file described below) containing one transaction per donation. If you have two or more donations for the same donor on the same date, they will be combined into one transaction. That's based on the most likely situation, where one actual donation was for two or more donation categories, and thus entered as two donations in the program.
If you forget to print either of those reports, see the section below on Correcting Errors in Bank Deposits for how to re-retrieve a deposit on this window that you have previously saved. Having retrieved it, you can again use the Report button. Alternatively, you can use the Reports ⇒ Bank Deposit ⇒ One Deposit Details menu option to print the same report for a previously saved bank deposit entered with a specified deposit date.
Exporting your Transaction to a File
Next, as long as you are using either Software4Nonprofits ACCOUNTS or Intuit QuickBooks Desktop, you can use the Export button to export a file that can be imported into the appropriate program, which will insert individual transactions representing the donations in this bank deposit. It will exactly match the third part of the report mentioned above.
If you have entered Fees for the donations included in the bank deposit, the fee will be subtracted from the total amount you entered for the donation, to create the main amount being deposited to the specified Bank Account. Then it will be also appear as part of the "splits", using the Fee Account. So for instance, here's an example transaction that would be in the export, from the third section of the report:
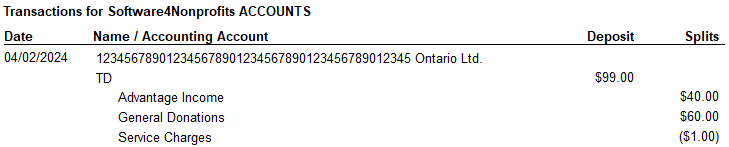
In this sample:
•"12345...Ontario Ltd." is the name of the donor (a business, in this case).
•TD is the bank it was deposited to.
•The donation was for $100, but a $1 fee was charged, so that's why the Deposit amount is $99.
•It was a donation with Advantage, with the Advantage being $40, put into an account called "Advantage Income" and the main Income account being "General Donations" (so that amount is $60).
•The Fee Account was specified as the Expense account "Service Charges", and shows as negative $1.
•You will see that the Splits amounts add up to the same total as the Deposit amount, so this is a balanced accounting transaction.
If you have configured that you are using the ACCOUNTS program, and the ACCOUNTS program is installed on the same computer on which you are running DONATION, the export file will be put into the Import subdirectory of the ACCOUNTS program's data directory. (The ACCOUNTS data directory is like DONATION's data directory, but ending in "Cooperstock Software\Accounts" instead of "Cooperstock Software\Donation".) Also, in this case, after the export has completed, you will be given an option to run ACCOUNTS and have it automatically prompt to import the file.
If you have configured that you are using QuickBooks Desktop, or you have configured that you are using ACCOUNTS but ACCOUNTS is not installed on your computer, the export file will be put into the Export subdirectory of DONATION's data directory.
The exported file name will be BankDeposit-YYYY-MM-DD.DB.IIF for you are exporting for QuickBooks Desktop, or BankDeposit-YYYY-MM-DD.DB.S4AIF if you are exporting for ACCOUNTS, where YYYY-MM-DD is the bank deposit date you entered when creating the bank deposit. (The ".DB" part will change appropriately if this is for an additional database created with the Database ⇒ Switch Databases menu option.)
In either case, you will also be given an option to email the exported file (as an attachment) to someone else. This is for the common situation where there is a separation of duties, with one person handling the donations, and another person handling the accounting.
Please see either Importing Bank Deposits into ACCOUNTS or Importing Bank Deposits into QuickBooks to learn how to import the transaction into those programs, and to understand any relevant issues.
For accounting programs other than ACCOUNTS or QuickBooks Desktop, you can just use the details in the third part of the details report printed out above with the Report button to enter the transactions manually into that program.
If you create multiple bank deposits on the same date, for different bank accounts, their export file names will be the same, so if your accounting program is on the same computer, be careful to import the first one into your accounting program before you create the 2nd one in DONATION. Otherwise, the 2nd export file will overwrite the 1st export file! (If this does happen, you can get back to the 1st one again by re-retrieving the 1st bank deposit again in this window, as explained below under Correcting Errors in Bank Deposits, then using the Export button again.
Close this window when you are done.
Note: Unlike QuickBooks Desktop, QuickBooks Online does not have a facility for importing the sort of export files exported by DONATION, IIF files. So as with any other bookkeeping or accounting program other than DONATION or QuickBooks Desktop, you can just manually enter the printed-out summary transaction for Bank Deposits into QuickBooks Online. There are apparently also 3rd-party programs that allow for the importing of IIF files into QuickBooks Online, but doing that would not be supported by us, because it is not our product!
Correcting Errors in Bank Deposits
If you have saved (and perhaps printed and exported) a bank deposit, and then realize that it was not correct (the right donations were not included in it, the date or bank account was wrong, etc.), first make any relevant changes to your configuration (such as changes to how you associate accounts with categories, or which donation Paid By values are included in Cash and Cheques bank deposits), if they might be part of the problem. Then come into this window, enter the Bank Deposit Date and the other fields at the top, and click Retrieve Donations.
You will be prompted as to whether you wish to edit the existing bank deposit to that bank on that date, and also in some cases given an explanation of how you can create additional bank deposits to the same account on the same date (a rather unusual requirement). Let's assume you agree to edit the existing deposit.
Your list of donations previously saved in this bank deposit will then be displayed, along with any others that now satisfy the criteria (including being on or after the Include Donations Starting on date). The additional donations that are retrieved, that were not originally saved as part of the bank deposit, will not have "Include" checked yet, so you can decide which of them to include. You can then make any appropriate changes, checking or unchecking the "Include" checkbox, and entering Fee amounts, until the bank deposit is correct. Save that, then as before, do any of the other actions that you need: Report, and Export.
When you click Save, if you have made any changes at the top of the window, such as changing the deposit date or bank account, you will be asked to confirm that you really want to make those changes.
If you are not sure of the bank deposit date of a prior bank deposit that you want to correct, you can use Reports ⇒ Bank Deposit ⇒ Summary List to see a list of all bank deposits that you have recorded this year (one line per deposit). If you need to see the full details of one of those bank deposits as a report, without using this window, you can use Reports ⇒ Bank Deposit ⇒ One Deposit Details.
Correcting Imported Transactions
In some cases, the transaction you export from DONATION may still not be correct or may be incomplete.
In that case, just open up the imported transaction in your accounting program (after you import it) and adjust it as required.
Deleting Bank Deposits
Occasionally you might conclude that you have specified a bank deposit that you are not actually going to make, or that is so incorrect you want to start over. After specifying the bank account information and deposit date for that deposit and clicking Retrieve Donations, if you choose the option in the message box that comes up to edit that existing deposit, a new button for Delete Deposit will appear to the right of the Retrieve Donations button.
If you click that Delete Deposit button, after confirming that this is what you really want to do, the record of being part of that bank deposit will be removed from the donations that were part of it, and the record in the database of that bank deposit existing at all will also be removed. (The donations are not removed!)
If you have already exported that bank deposit and imported it into your accounting program, or manually entered it into your accounting program, you will probably also need to delete that transaction in the accounting program.
This topic was last edited on Sep 16, 2024